Indicwiki Training Manual IITK
Project Objective
Wikipedia is a major source of reference for a large number of people the world over. Unfortunately, the amount of Hindi content in Wikipedia is very low and not in proportion to the Hindi speaking public or users. In this project, we would like to correct that to an Extent.
The primary objective of this project is to generate entries in Hindi on Science and Technology in Wikipedia. This is a big target and can only be achieved through multiple strategies. One of them is to take existing English language entries and translate them using Machine Translation technologies and manually improve the translated output. This will require improving the existing translation systems and this would be one of the collateral deliverables.
New content on topics that would be of relevance to identified Indian audiences will be generated either by translation or directly writing on Wikipedia. This requires training the scientific writers in content markup and Wikipedia editing skills. This would result in, apart from the content, a set of people who are trained in collaborative content creative technologies.
Step-by-step procedure for using Wikipedia
1.Creating an Account
To create an account on IndicWiki:
Follow the below instructions to create your own IndicWiki account:
- Load the IndicWiki website on your browser - https://alpha.indicwiki.in/index.php?title=Main_Page.
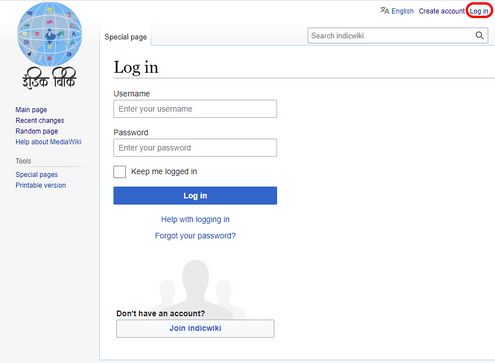
2. Click on the Log in/Create account in the top right corner of the webpage.
3. This will bring you to the login page which will give you the option to Log in or Create account.
Click on Login if you already have an account OR Click on the Create account which will take you to the page where you will enter your details .
4. After creating the account you can login to IndicWiki and once you will be logged in then you will see this page.
5. Congratulations you now have an IndicWiki account! (Write your username and password down somewhere safe so you don’t forget it. You will now be directed to the below screen.
You will notice the following new links available at the top right corner of your screen:
Your username – links to your personal user page
Preferences – allows you to customize your personal settings for using Wikipedia.
Watchlist - allows you to bookmark pages you wish to edit or contribute to.
Talk – links to a page you can receive and respond to messages from other Wiki contributors.
Contributions – detail all the edits you have made to IndicWiki since you created your account.
Log Out – the logout button for when you wish to leave your Wiki account.
Creating your User Page
One of the first things you may wish to do is create your own user page. You can add as much or as little information as you wish - generally, it is recommended that you do not include personal information, but you might consider adding some general information about yourself.
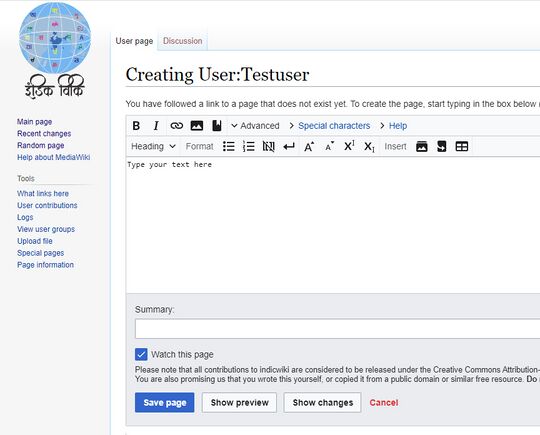
- Click on your Wiki username link on the top right corner of your screen.
- Click on create this page: link.
You can check your changes at any time by selecting Show Preview, and selecting Save
Page when ready.
2. Preferences
Clicking on the My Preferences option mentioned above will bring you to a page where you can change how you view IndicWiki, and provide some additional functionality that can be useful. The first tab,
- User profile - will give some basic information about your account - how long you have make Editing easier, make sure the following two settings are activated. The Date and Time tab will allow you to set the time zone in which you reside. This will automatically adjust some information (such as the times that appear on your watchlist) to your local time.
3. Watchlist
- Watching pages allows you to keep a list of "watched" pages and to generate a list of recent changes made to those pages. This way you can keep track of and react to what's happening to pages you have created or are otherwise interested in.
The two easiest ways to add pages to your watchlist are:
- When viewing a page, click the star sign between the 'View history' tab and the search box at the very top of the page. The star will turn blue meaning your chosen article is now listed on your Watchlist.When editing a page, check or uncheck "Watch this page" before saving (above the 'Show preview' button')
To view your Watchlist:
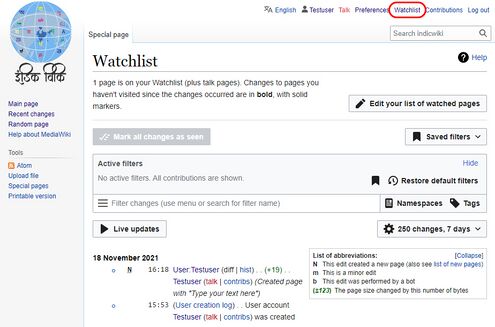
Click on the My Watchlist tab that appears at the top right corner of your screen when logged in. Any recent changes made to the articles you are watching will be shown. Each line shows details of each edit: whether minor (m), whether made by a bot (b), if a new page was created (N), the time, a link to the page, a link to the difference ("diff") made by the edit
in the question, a link to the page history ("hist"), the editor's user name or IP address, the increase (green) or decrease (red) in the number of bytes (the computer file size of the article) To view the list of the articles you are watching or to edit the list and remove an article from your watch list
- Click View and Edit Watchlist below the Watchlist title (see below).
4. Contributions
Similar to My Watchlist except this list focuses only on the pages you have worked on, edited, or created. It allows you to find out whether there have been any subsequent edits. This can be a useful alternative to accessing your watchlist, particularly if your watchlist contains a large number of page.
5. Creating a New Article
1.The first step is to decide what you want to write an article about. Research your topic, and check that it is not already on IndicWiki! Ensure that you have online\ references so that the authenticity of the article can be verified. Books can also be used as a reference, with the usual bibliographic details including the ISBN.
2. Choose very specific topics, not general. For example, an article on frogs in Queensland is considered too broad, but an article on the green tree frog (Litoria caerulea) is acceptable. When putting together the structure of your article, remember the following writing style points: NPOV – Neutral point of view – write your article in a factual, informative way and not Promotional
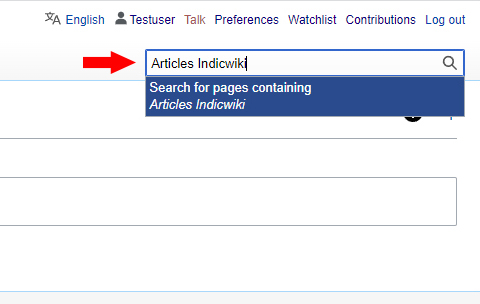
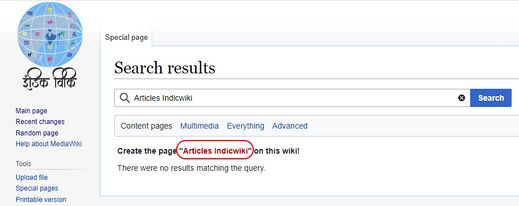
3.Before creating an article, you should search to check that there is no similar article that already exists. If there isn't, continue to Step 3
4.If no article exists. Now’s your chance to create one.
6. Editing an Article
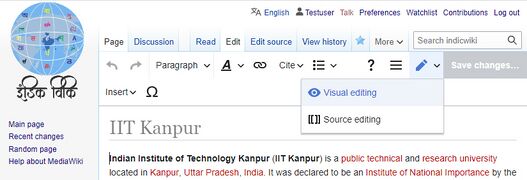
1.The Visual Editor lets you edit the text on the screen just as it appears on a Wikipedia page, similar to other word processing applications and websites. Source editing lets you see the underlying Wikicode, which resembles HTML. When you're using the Visual Editor, you can switch to source editing (and back to visual editing)by clicking the pencil icon at the top right.
2. The Visual Editor simplifies the process of adding text, citing sources, linking to other Wikipedia articles, and formatting your article.
7. Editing article using the Visual Editor
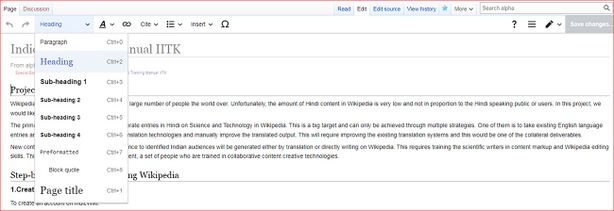
Open your sandbox and click on the “Edit” button, you will see the toolbar with different options.
Paragraph
Set the style of your text. For example, make a header or plain paragraph text. You can also use it to offset block quotes.
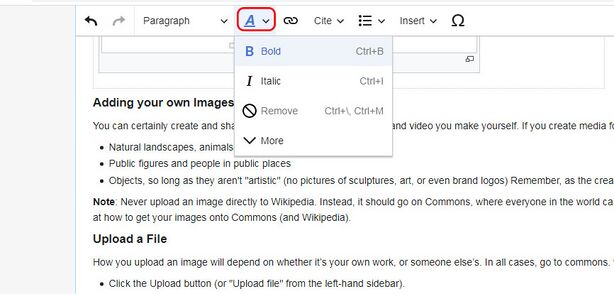
A
Highlight your text, then click here to format it with bold, italics, etc. The “More” options allow you to underline (U), cross-out text (S), add code snippets ( { } ), change language keyboards (Aあ), and clear all formatting ().
Links
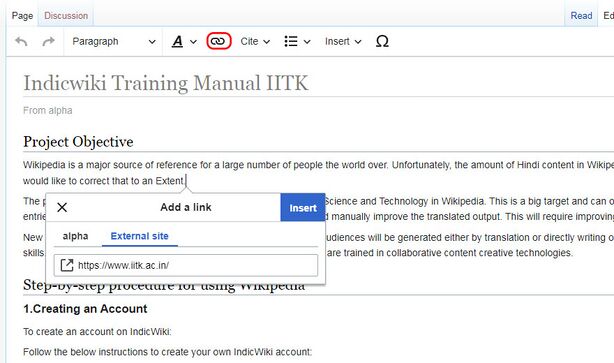
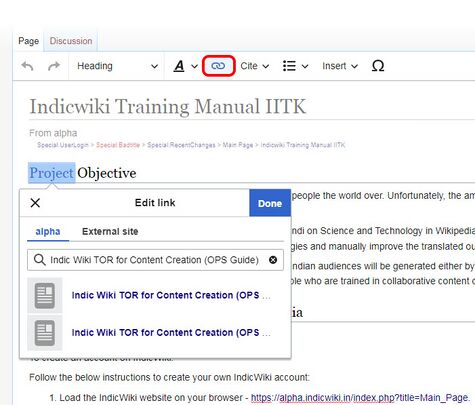
Highlight text and push this button to make it a link. The Visual Editor will automatically suggest related Wikipedia articles for that word or phrase. This is a great way to connect your article to more Wikipedia content. You only have to link important words once, usually during the first time they appear. If you want to link to pages outside of Wikipedia (for an “external links” section, for
example) click on the “External link” tab.
Cite
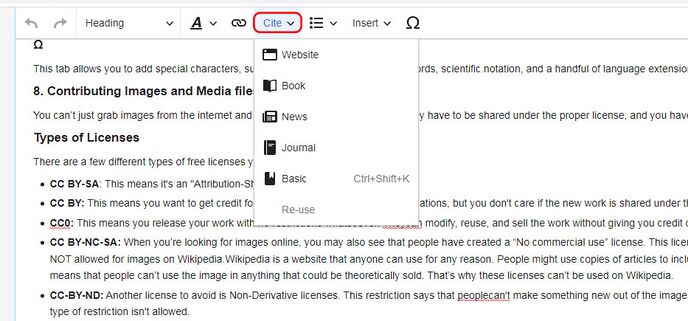
The citation tool in the Visual Editor helps format your citations. You can simply paste a DOI or URL, and the Visual Editor will try to sort out all of the fields you need. Be sure to review it, however, and apply missing fields manually (if you know them). You can also add books, journals, news, and websites manually. That opens a quick guide for inputting your citations.
Once you've added a source, you can click the “re-use” tab to cite it again.
Bullets
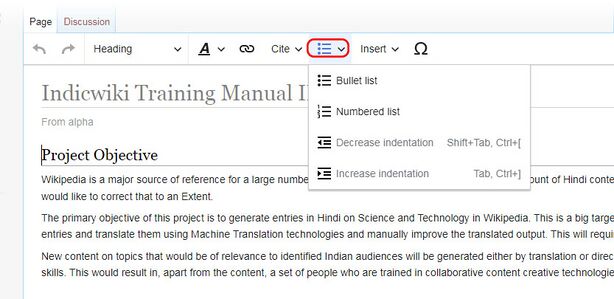
To add bullet points or a numbered list, click here.
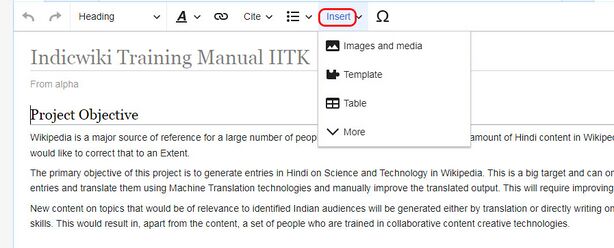
Insert
This tab lets you add media, images, tables, chemical formulas, math formulas, graphs, maps, etc.
Ω
This tab allows you to add special characters, such as those found in non-English words, scientific notation, and a handful of language extensions.
8. Contributing Images and Media files
You can’t just grab images from the internet and add them to a Wikipedia article. They have to be shared under the proper license, and you have to be able to find and show that license.
Types of Licenses
There are a few different types of free licenses you can use on Wikipedia.
- CC BY-SA: This means it's an "Attribution-Share Alike" license.
- CC BY: This means you want to get credit for work, including remixesand modifications, but you don't care if the new work is shared under the same license.
- CC0: This means you release your work with no restrictions whatsoever. Theycan modify, reuse, and sell the work without giving you credit or following a similar license.
- CC BY-NC-SA: When you’re looking for images online, you may also see that people have created a “No commercial use” license. This license means the creator has forbidden that work from being sold. That kind of license is NOT allowed for images on Wikipedia.Wikipedia is a website that anyone can use for any reason. People might use copies of articles to include in textbooks, or as examples in a book about their topic. A Non-Commercial license means that people can’t use the image in anything that could be theoretically sold. That’s why these licenses can’t be used on Wikipedia.
- CC-BY-ND: Another license to avoid is Non-Derivative licenses. This restriction says that peoplecan't make something new out of the image, under any circumstance. That's not something we can promise on Wikipedia, so this type of restriction isn't allowed.
An easy way to find Images
Luckily, there’s a website that makes that very easy: Creative Commons Search*. CC Search is a search engine for content specifically filtered to match the types of licenses you’re looking for.
Using CC Search
- Creative Commons is a non-profit that helps spread the word about free licenses. It's not actually connected to Wikipedia, but they've created a search engine that will help find materials that fit a certain type of license: CC Search. Let's look at how it works.
- First, go to search.creativecommons.org.
- Next to the green “CC Search” box, type in the topic of your search, just like you would any search engine. Beneath the search query, you MUST click the two boxes, “use for commercial purposes…” and “modify, adapt, build upon…”. If you do not click those two boxes, you may NOT be able to use the images you find through this search on Wikipedia.
- Click the boxes below the search box to choose which sites you want to search for Wikipedia-acceptable i
- mageshttps://search.creativecommons.org
Adding your own Images
You can certainly create and share graphs, maps, diagrams, audio, and video you make yourself. If you create media for any of the following, you can share it:
- Natural landscapes, animals, and plants
- Public figures and people in public places
- Objects, so long as they aren't "artistic" (no pictures of sculptures, art, or even brand logos) Remember, as the creator of the image, you’re agreeing to share your own work under the licensing terms we’ve previously described.
Note: Never upload an image directly to Wikipedia. Instead, it should go on Commons, where everyone in the world can access it. Your image may end up in other Wikipedia articles, or Wikipedia articles in other languages. Let’s look at how to get your images onto Commons (and Wikipedia).
Upload a File
How you upload an image will depend on whether it’s your own work, or someone else’s. In all cases, go to commons. wikimedia.org first, and make sure you are logged in.
- Click the Upload button (or "Upload file" from the left-hand sidebar).
If you find an image through CC Search
- Download the image, make a note of the author, and a link to the original source.
- Select "This file is not my own work" when you begin your image upload.
- Give the name of the source of the image (a direct link is preferred).
- Name the original creator of the image (this can be an agency or organization).
- Beneath that, carefully select the source of the image from the options provided, and select the license that matches the way the image is shared.
- If you can't answer these questions, it may mean the image isn't appropriate to use. Never try to work around these questions by claiming an image is yours if it isn't. That's a copyright violation.
If the work is your own work
- If you took a photo of a landscape, person, or non-copyrighted object, that photo is "your own work."Screenshots of copyrighted content are not your own work, nor are images you took of a book page.
- Select “This is my own work,” and enter your username in the blank space. That’s all there is to it!
Name your File
- The image will upload. Enter a unique name for the file, something you think someone might search for to find the file. This name will also become the name of the page. Then enter a description.
- You should add categories to your image, too. Categories will put your uploaded media into a general catch-all page where people can find it. For example, "Category: Bonsai" collects all the photos of bonsai trees that were uploaded (and tagged) on Commons.

